thinkcmf5(tp5.0) + workman实现简单客服聊天功能

配置过程中遇到的问题及说明:

1、首先需要对长连接相关概念有一定了解。

2、通过composer默认安装的workman版本不对,报错,使用命令composer require topthink/think-worker=1.0.1

3、通过1、发现composer包列表网址,https://packagist.org,可以通过该网址查找composer包,包括说明。

4、报错:stream_socket_server() has been disabled for security reasons … ,修改php.ini,disable_functions项,去掉stream_socket_server。


安装步骤说明:

1、composer安装命令,composer包安装倒了vendor/workerman/目录中。


GeSHi Error: GeSHi could not find the language php (using path /home/wwwroot/www.hillmatrix.com/wp-content/plugins/codecolorer/lib/geshi/) (code 2)

2、在项目根目录中新建server文件,内容如下:


GeSHi Error: GeSHi could not find the language php (using path /home/wwwroot/www.hillmatrix.com/wp-content/plugins/codecolorer/lib/geshi/) (code 2)

3、服务器端控制器代码:


GeSHi Error: GeSHi could not find the language php (using path /home/wwwroot/www.hillmatrix.com/wp-content/plugins/codecolorer/lib/geshi/) (code 2)

4、linux进入项目根目录,启用服务监听端口。

1
php server start
1
2
3
4
5
6
7
8
Workerman[server] start in DEBUG mode
------------------------------------------- WORKERMAN --------------------------------------------
Workerman version:3.5.17 PHP version:5.6.36
-------------------------------------------- WORKERS ---------------------------------------------
proto user worker listen processes status
tcp root none websocket://0.0.0.0:2346 1 [OK]
--------------------------------------------------------------------------------------------------
Press Ctrl+C to stop. Start success.

5、前端页面

1
2
3
4
5
6
7
8
9
10
11
12
13
14
15
16
17
18
19
20
21
22
23
24
25
26
27
28
29
30
31
32
33
34
35
36
37
38
39
40
41
42
43
44
45
46
47
48
49
50
51
52
53
54
55
56
57
58
59
60
61
62
63
64
65
66
67
68
69
70
71
72
73
74
75
76
77
78
79
80
81
82
83
84
85
86
87
88
89
90
91
92
93
94
95
96
97
98
99
100
101
102
103
104
105
106
107
108
109
110
111
112
113
<style>
        .content{<br />            width: 700px;<br />            margin: auto;<br />        }<br />        .box{<br />            padding-bottom: 3px;<br />            padding-top: 3px;<br />        }<br />        .box input{<br />            width: 70%;<br />        }<br />        .box button{<br />            width: 25%;<br />        }<br />    </style>

&nbsp;
<h3>CHAT TEST</h3>

<hr />

<div class="content">
<div class="box"><input name="name" type="text" />
<button id="setName">设置昵称</button></div>
<div class="box"><input name="message" type="text" />
<button id="send">发送</button></div>
<div id="content" class="box"></div>
</div>
<script>
    var ws;
    var connected = false;

    $(function () {

        ws = new WebSocket("ws://local.hillmatrix.com:2346");
        ws.onopen = function() {
            console.log('WebSocket 连接成功');
            connected = true;
        };
        ws.onmessage = function(e) {
            // e.data
            console.log(e.data);
            try {
                var data = JSON.parse(e.data);
                //非法数据,不处理
                if (!data.hasOwnProperty("code")) return;
                if (data.code != 0){
                    if (data.hasOwnProperty("msg")){
                        alert(data.msg);
                    }
                    return
                }

                if (!data.hasOwnProperty("data") || !data.hasOwnProperty("type") || !data.hasOwnProperty("data")) return;

                switch (data.type){
                    case 'private_message':
                        addChatItem(data.data.name + '(悄悄的...)',data.data.message)
                        break;
                    case 'message':
                        addChatItem(data.data.name,data.data.message)
                        break;
                    case 'msg':
                        alert(data.data.msg)
                        break;
                }

            }catch (ex) {

            }
        };

    });

    $("#setName").click(function () {
        var name = $('input[name=name]').val().trim();
        if (name==''){
            alert('昵称不能为空');
            return;
        }
        sendData('setName',{name:name});
    });

    $("#send").click(function () {
        var message = $('input[name=message]').val().trim();
        if (message==''){
            alert('内容不能为空');
            return;
        }

        if(message.indexOf(":") >= 0){
            sendData('private_message',{message:message});
        }else{
            sendData('message',{message:message});
        }

    })

    function addChatItem( name,message ) {
        var temp = '</p>
<p>
</p>
<div class="box"><p>
</p>
<p>__NAME__ 说:</p>
<p>
</p>
<p>__CONTENT__</p>
<p>
</div>
<p>
</p>
<p>';
        temp = temp.replace( "__NAME__",name );
        temp = temp.replace( "__CONTENT__",message );
        $("#content").append(temp);
    }

    function sendData(type,data) {
        if(ws.readyState != 1){
            alert(connected ? "连接已中断" : "连接不成功");
            return;
        }
        ws.send(JSON.stringify({type:type,data:data}));
    }
</script>
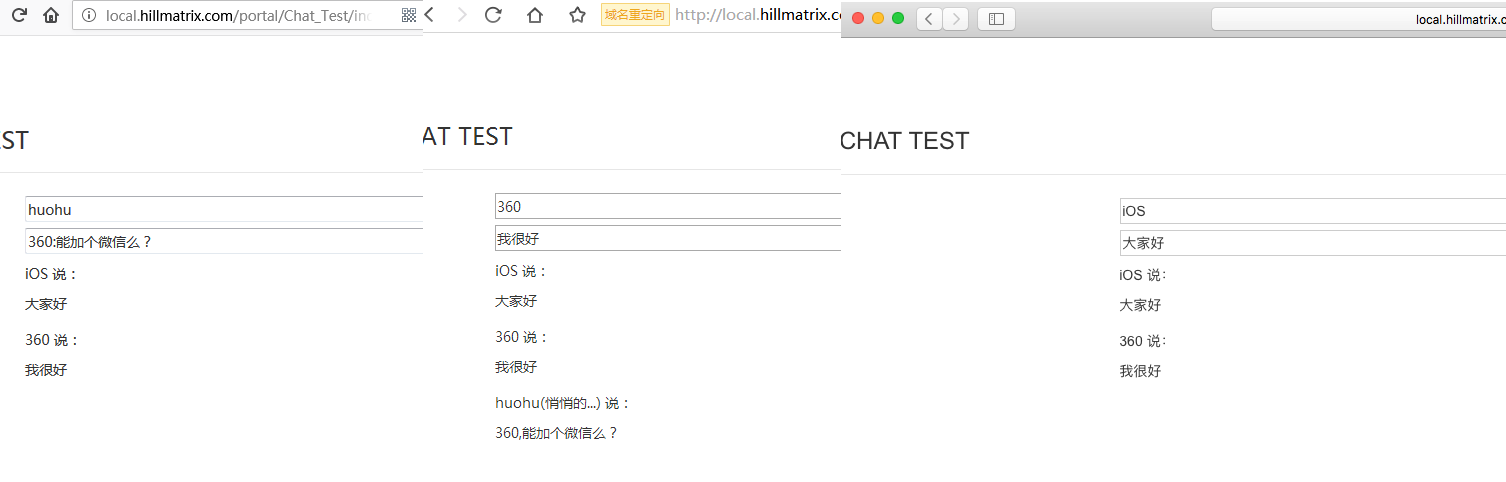
6、测试效果

参考代码:https://gitee.com/goto8848/build_a_simple_chat_room_with_workerman

官方文档:http://doc.workerman.net/faq/send-data-to-client.html

thinkphp5.1 + workerman 留着以后参考:https://blog.csdn.net/qq_27238185/article/details/81477303

PDF文档数字签名

fpdf官网:http://www.fpdf.org/?lang=zh

tcpdf官网:https://tcpdf.org/

1、对证书签名与验签逻辑优化,在linux系统中生成根证书CA,用CA为子证书签名,最后使用子证书为pdf做签名,防止pdf伪造自签证书。

1
2
3
4
5
6
7
8
#1、生成根证书 #a).生成根证书私钥(key文件)
openssl genrsa -aes256 -out ca.key 2048

#b).生成根证书签发申请文件(csr文件)
openssl req -new -key ca.key -out ca.csr -config /usr/lib/ssl/openssl.cnf

#c).自签发根证书(crt文件)
openssl x509 -req -days 3650 -sha1 -extensions v3_ca -signkey ca.key -in ca.csr -out ca.crt
1
2
3
4
5
6
7
8
9
10
11
#2、用根证书签发server端证书
#a).生成根证书私钥(key文件)
openssl genrsa -aes256 -out tcpdf.key 2048

#b).生成根证书签发申请文件(csr文件)
openssl req -new -key tcpdf.key -out tcpdf.csr -config /usr/lib/ssl/openssl.cnf

#c).使用根证书签发服务端证书
openssl ca -in tcpdf.csr -out tcpdf.crt -days 730 -cert ca.crt -keyfile ca.key -config /usr/lib/ssl/openssl.cnf

#The organizationName field needed to be the same in the CA certificate (Timeswealth Global Root CA)

若发生错误: I am unable to access the ./demoCA/newcerts directory ./demoCA/newcerts: No such file or directory

做如下处理

1
2
3
4
5
mkdir demoCA
mkdir demoCA/newcerts
mkdir demoCA/private
touch demoCA/index.txt
echo "01" &gt;&gt; demoCA/serial

备注:一下是tcpdf官方提供的生成自签名证书方法,测试用,如果用于实际会有逻辑漏洞,没有根证书约束。

1
2
3
4
5
6
7
8
9
10
11
/* NOTES:

- To create self-signed signature: openssl req -x509 -nodes -days 365000 -newkey rsa:1024 -keyout tcpdf.crt -out tcpdf.crt

- To export crt to p12: openssl pkcs12 -export -in tcpdf.crt -out tcpdf.p12

- To export p12 to pfx: openssl pkcs12 -export -inkey tcpdf.crt -in tcpdf.crt -out tcpdf.pfx

- To convert pfx certificate to pem: openssl pkcs12 -in tcpdf.pfx -out tcpdf.crt -nodes

*/

自己封装的tcpdf操作类


GeSHi Error: GeSHi could not find the language php (using path /home/wwwroot/www.hillmatrix.com/wp-content/plugins/codecolorer/lib/geshi/) (code 2)

操作类的使用

1
2
3
4
5
6
7
8
9
10
11
12
13
14
15
16
17
<pre>require_once APP_ROOT_PATH."/system/utils/tcpdf_proxy.php";

$tcpdf = new TcpdfProxy();

$html = '&lt;html&gt;content&lt;/html&gt;';

$singConf = array();

$singConf['image'] = APP_ROOT_PATH.app_conf('CONTRACT_SEAL');

$singConf['sign_info'] = array(
    'Name' =&gt; app_conf('SHOP_TITLE'),
);

$tcpdf-&gt;setSignConf($singConf);

$tcpdf-&gt;outputPdf($html,'contract.pdf');</pre>

Git服务器搭建与客户端简单操作

服务器端准备工作:

1. 安装git

1
apt-get install git

2. 为了安全,新建一个专门用于代码部署的无特权用户

1
2
3
useradd -m git
#设置该用户的密码
passwd git

3. 新建一个目录作为要部署代码的根目录,如:

1
mkdir /var/www/git/item.git

4. 将这个目录的属主和属组都改为上面新建的用户git

1
2
cd /var/www/git
chown git:git item.git

5. 切换到部署代码的专用用户

1
su git

6. 进入项目根目录,初始化为git仓库

1
2
cd item.git
git init Initialized empty Git repository in /var/www/git/item.git/.git/

7. 必要的配置

1
2
3
4
5
6
7
8
#让仓库接受代码提交
git config receive.denyCurrentBranch ignore

#可选
git config core.worktree ~/www

#可选,禁止强制推送
git config --bool receive.denyNonFastForwards false

注意!

我们可以在自己的服务器上创建git仓库,有两种方式:

git –bare init (裸仓库)

git init

两者区别:

1,普通git仓库的目录结构就和你的代码目录结构一致,只多了.git目录,.git目录中包含了git的一些配置等数据

2,裸仓库只保存了一些配置信息等,肉眼是找不到我们所上传的代码的

额外说明:用”git init”初始化的版本库用户也可以在该目录下执行所有git方面的操作。但别的用户在将更新push上来的时候容易出现冲突。比如有用户在该目录(就称为远端仓库)下执行git操作,且有两个分支(master 和 b1),当前在master分支下。另一个用户想把自己在本地仓库(就称为本地仓库)的master分支的更新提交到远端仓库的master分支,他就想当然的敲了git push origin master:master于是乎出现错误 ,因为远端仓库的用户正在master的分支上操作,而你又要把更新提交到这个master分支上,当然就出错了。

确定一个repository是否为bare库的关键在于core.bare属性(boolean型属性)。core.bare属性可以有git config命令设置,也可以通过修改config文件的方式设置,conf文件指的就是当前库下面的conf配置文件,如果这里 bare = true 那么即使有.git文件夹也还是不能进行相关操作。 如果使用了git init初始化,则远程仓库的目录下,也包含work tree,当本地仓库向远程仓库push时, 如果远程仓库正在push的分支上(如果当时不在push的分支,就没有问题), 那么push后的结果不会反应在work tree上, 也即在远程仓库的目录下对应的文件还是之前的内容,必须得使用git reset –hard才能看到push后的内容.

本地仓库准备工作:

1. 通过 git clone 或 git pull 从仓库上将代码获取到本地

1
2
3
4
Administrator@PC-20170526BRPS MINGW32 /d/www/gitgit clone git@t.024ea.com:/var/www/git/item.git

Cloning into 'item'...
git@t.024ea.com's password: warning: You appear to have cloned an empty repository.

接下来接个phpstrom编辑更改代码提交,就简单了。

git利用post-receive自动化部署:

1. 更新服务端 git 仓库状态并检出文件

1
2
3
4
5
6
7
8
9
10
11
12
13
14
cd /var/www/git/item.git
git update-server-info
git checkout -f

# OR:

# 如果push的不是master分支
# git checkout branch_name

ls
new.html
cat new.html
#已经能看到提交文件
hello new git!

2.设置服务器钩子

1
2
3
4
5
6
#仓库配置文件
cd /var/www/git/item.git/.git/hooks

#默认没有这文件,新建了一个
touch post_receive
vim post_receive

shell脚本

1
2
3
4
5
6
7
8
9
10
#!/bin/sh
chown www-data /var/www/git/item.git -R
DEPLOY_PATH=/var/www/git/item.git

unset  GIT_DIR #这条命令很重要
cd $DEPLOY_PATH
git reset --hard
git pull
chown www-data -R $DEPLOY_PATH
chgrp www-data -R $DEPLOY_PATH

关于unset GIT_DIR的说明:

经过查找资料,如过没有unset命令,在文件中添加 git pull 时会报错,提示:”fatal: Not a git repository: ‘.'”。hook脚本执行了cd之后,继续执行git语句拉取的时候还是在hooks文件夹下,而不是cd的文件路径。git的hooks里面默认有一些环境变量,会导致无论在哪个语句之后执行git命令都会有一个默认的环境路径,既然这样unset 掉默认的GIT环境变量就可以了。

参考:http://alfred-long.iteye.com/blog/1836347

补充

关于本地第一次使用clone命令无法使用git用户登陆,需要先使用命令ssh-keygen,参考:

1
2
3
4
5
6
7
8
9
10
11
12
13
14
15
16
17
18
19
20
21
root@office-host-ubuntu:/var/www/git# ssh-keygen
Generating public/private rsa key pair.
Enter file in which to save the key (/root/.ssh/id_rsa)/home/git/.ssh/id_rsa
Enter passphrase (empty for no passphrase):
Enter same passphrase again:
Your identification has been saved in /home/git/.ssh/id_rsa.
Your public key has been saved in /home/git/.ssh/id_rsa.pub.
The key fingerprint is:
SHA256:eXBtsym+2BZfcbWIk3E7Xh6doWn7q1lzMotX1zXxsbY
root@office-host-ubuntu The key's randomart image is:
+---[RSA 2048]----+
|                 |
|           o . +.|
|        . . O = @|
|         + = @.O=|
|        S o * *o*|
|         o.. o.E+|
|          .o .++o|
|         o....+=o|
|        ..o .+o..|
+----[SHA256]-----+

ubuntu + phpStorm + Xdebug安装及调试设置

1、下载Xdebug

点击下载

2、安装

1、接下源码
1
tar zxvf xdebug.tar.gz
2、编译源码
1
2
3
4
5
cd xdebug
/usr/local/php/bin/phpize
./configure --enable-xdebug --with-php-config=/usr/local/php/bin/php-config
make
make install

安装完成后会出现:

1
2
3
4
5
6
7
8
9
10
11
12
13
14
15
16
17
18
19
20
21
22
Installing shared extensions:     /usr/local/php/lib/php/extensions/no-debug-non-zts-20160303/
+----------------------------------------------------------------------------------------------------+
|
| INSTALLATION INSTRUCTIONS
| =========================
|
| See http://xdebug.org/install.php#configure-php for instructions
| on how to enable Xdebug for PHP.
|
| Documentation is available online as well:
| - A list of all settings: http://xdebug.org/docs-settings.php
| - A list of all functions: http://xdebug.org/docs-functions.php
| - Profiling instructions: http://xdebug.org/docs-profiling2.php
| - Remote debugging: http://xdebug.org/docs-debugger.php
|
|
| NOTE: Please disregard the message
| You should add "extension=xdebug.so" to php.ini
| that is emitted by the PECL installer. This does not work for
| Xdebug.
|
+----------------------------------------------------------------------------------------------------+
3、修改配置文件
1
2
3
4
5
6
7
8
9
10
11
12
13
14
15
16
17
18
sudo vim php.ini
#加一下内容
[Xdebug]
zend_extension=/usr/local/php5.6/lib/php/extensions/no-debug-non-zts-20131226/xdebug.so
xdebug.idekey = PHPSTORM
xdebug.auto_trace = on
xdebug.default_enable = on
xdebug.auto_profile = on
xdebug.collect_params = on
xdebug.collect_return = on
xdebug.profiler_enable = on
xdebug.remote_enable = 1
xdebug.remote_host = 192.168.1.225
xdebug.remote_port = 9059
xdebug.remote_handler = dbgp
xdebug.remote_connect_back = 1
xdebug.trace_output_dir = "/usr/local/php/xdebug/"
xdebug.profiler_output_dir = "/usr/local/php/xdebug/"

重启lnmp后通过php -v应该可以看到

1
2
3
4
5
PHP 5.4.45 (cli) (built: Jan 19 2018 10:30:47)
Copyright (c) 1997-2014 The PHP Group
Zend Engine v2.4.0, Copyright (c) 1998-2014 Zend Technologies
with Xdebug v2.4.1, Copyright (c) 2002-2016, by Derick Rethans
with Zend Guard Loader v3.3, Copyright (c) 1998-2013, by Zend Technologies

4、安装火狐xdebug插件

下载插件地址

安装完毕之后, 打开该插件的options, 设置IDEKey为PhpStorm.

需要和phpstorm中设置的ide key 保持一致

5、phpstorm的设置

6、开始进行断点测试,断点测试前,可以进行xdebug的验证是否配置成功

第一个地址栏填写你的项目的地址

第二个地址栏填写你访问的地址

点击validate开始验证,若有错误,根据提示修改配置。

7、点击phpstorm小电话图标,开始监听,设置断点并并调试。

原理示意图(从xdebug的官网上引用的)